Connecting Deck and Patio Materials: Elevation, Transitions, and Cincinnati Frost-Line Footings
A deck and patio can work together as one outdoor space, or they can fight each other over the same square footage. The difference comes down to how you handle the deck to patio transition, where the elevation changes land, and whether the footings under the deck side are dug deep enough to survive a Cincinnati winter. This guide walks through the build in order, from measuring your grade to setting the final transition step, so you know what a good crew should be doing in your backyard and why.
Ohio's freeze-thaw cycles are the quiet factor behind most of these decisions. A deck footing that stops short of the frost line can heave an inch or two every winter, and a patio poured tight against a deck post will crack when the two move at different rates. Get the foundation and the transition right, and the rest of the project is mostly finish work.
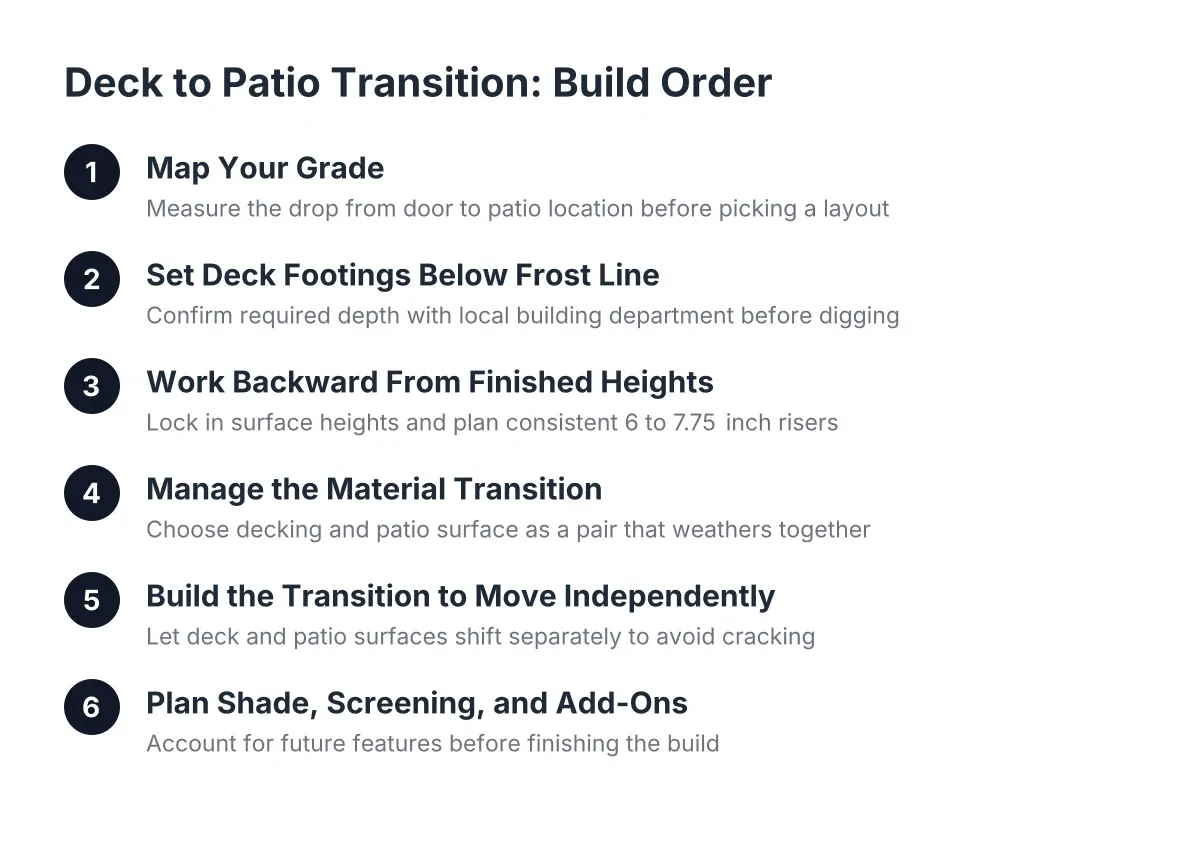
Step 1: Map Your Grade Before You Pick a Layout
Start by figuring out how much your yard drops from the back door to where the patio will sit. Most greater Cincinnati lots have at least some slope, and that slope decides the whole design. Stretch a string level from the door threshold out to the patio location and measure the drop at a few points.
Here is the practical rule. If your door sits 24 inches or more above grade, you need a deck at the house; code requires guardrails once a walking surface is 30 inches up, and stairs straight off a tall threshold feel awkward. If the drop is under about 8 inches, a ground-level patio alone might reach the door. A deck and patio combo earns its keep in the middle ground, where the deck handles the elevation at the house and the patio takes over where the yard flattens out.
Sketch the result on paper. Mark where the deck ends, where the patio begins, and where the step or steps between them will land. That transition line is where most of the decisions in the next steps happen.
Step 2: Set Deck Footings Below the Cincinnati Frost Line
Dig every deck footing below the local frost depth; in Hamilton County and the surrounding area, that means confirming the required depth with your local building department before you dig, since it varies by jurisdiction. According to Decks.com, when a post is part of a structural build such as a deck footing, the hole must go below the local frost line rather than relying on general above-grade post rules. Footings that stop in the frost zone can shift during winter freeze cycles, and a deck that heaves even slightly will rack its railings and open gaps at the ledger.
Footing diameter matters as much as depth. Footings sized too small for the load can sink under the weight of the deck, framing, and everything on it, including a future hot tub. Sizing sometimes calls for a structural engineer's calculations, especially for multi-level deck designs or anything carrying concentrated loads. This is a spot where a deck contractor earns their fee; a sunken corner is far harder to fix after the fact than a bigger footing is to pour up front.
Take your time at this stage. Problems introduced at the footing phase get progressively harder to correct as the build goes up, because everything above inherits the error.
Step 3: Work Backward From Finished Heights
Next, lock in your finished surface heights before any framing starts. A good builder works backward from the finished deck surface: subtract the thickness of the decking, the joists, the beam, and any standoff hardware to find where the top of each footing must land. Do the same math on the patio side, accounting for the paver or concrete thickness plus the compacted base beneath it.
This is also where you decide the step-down between deck and patio. Aim for riser heights between 6 and 7.75 inches, kept consistent; an odd final step is the detail people trip on for years. Suppose a homeowner in Anderson Township has a door 34 inches above grade. One workable layout is a 12-by-14 deck at door height, one intermediate landing, then two steps down to a paver patio, which splits the drop into comfortable, code-friendly risers.
For low decks where the drop is minimal, adjustable pedestal systems are worth knowing about. According to Bison Innovative Products, adjustable deck pedestal systems can eliminate the need to pour concrete footers for a ground-level deck, which simplifies the low side of a combo build.
Step 4: Managing the Transition Between Deck and Patio Materials
Pick your decking and patio surface as a pair, not separately. The combination has to look right together and weather together, because the transition line between them is the most visible seam in the whole project. In practice, three pairings cover most Cincinnati builds:
- Treated wood decking with poured concrete: the budget pairing, and the one most backyard deck ideas on a budget land on. For a rental property owner managing several units, treated wood plus concrete keeps cost per property down and holds up to tenant turnover.
- Composite decking with concrete pavers: the most common upgrade pairing. Trex and TimberTech both offer earth-tone boards that sit naturally next to gray or tan pavers, and composite drops the restaining cycle that wood demands every few years.
- Composite decking with stamped or broom-finished concrete: a clean, low-seam look where the patio reads as a continuation of the deck rather than a separate pad.
Durability details matter more than color. Per the Remodeling 2024 Cost vs. Value Report, a new 16-by-20 pressure-treated wood deck averages $17,615 nationally with an 83 percent return at resale, while the same deck in composite runs $24,206 with a 68 percent return. Wood recoups more; composite costs less to own year over year. A landlord and an owner-occupant will read those numbers differently, and both readings are correct.
Whatever you choose, match the hardware to the material. According to Simpson Strong-Tie, hangers and connectors used with pressure-treated wood need a heavier zinc coating, such as the ZMAX line, to resist corrosion from the copper-based preservative in the lumber. In addition, taping the tops of joists with waterproofing tape is a moisture measure professional builders use even on treated framing, per TimberTech.
Step 5: Building the Transition So Surfaces Move Independently
Now connect the two surfaces, and do it in a way that lets each one move on its own. The deck rides on frost-depth footings; the patio floats on a compacted stone base. In an Ohio winter they will not move together, so never pour a patio tight against deck posts or pin paver edging to deck framing. Leave a small expansion gap at the seam, or run a soldier course of pavers as a border that can shift without cracking.
Keep drainage flowing away from both structures. Pitch the patio about a quarter inch per foot away from the deck and the house, and make sure the step-down from decking to pavers does not create a shelf where water pools against your rim joist. When connecting the deck to patio at the stair landing, set the bottom tread on the patio surface itself rather than on separate small footings whenever the design allows; it reads cleaner and eliminates another thing that can heave.
Finish details decide whether the seam looks intentional. Plan fascia boards to end at a natural transition point, such as a stair cascade, instead of butting together at an outside corner where the material has no room to expand. On composite builds, matching plugs can hide screw heads on border boards where fasteners must come from the top, according to Trex, which keeps the picture-frame edge at your transition clean.
What If You Are Connecting to an Existing Deck or Patio?
Tying new patio space into an existing deck follows the same rules, with one added check: inspect what is already there before you build against it. Confirm the existing footings reach frost depth and the ledger connection is sound, then design the new patio to float independently beside the old structure. As many as 60 percent of the roughly 45 million decks in America have safety issues, per the International Association of Certified Home Inspectors, and about 90 percent of collapses trace to ledger failures.
For a rental property, this check does double duty. A loose railing or soft board next to a brand-new patio is exactly the kind of liability that triggers a failed inspection or a tenant complaint, so fold deck repair into the combo project rather than building around a problem.
Step 6: Plan Shade, Screening, and Future Add-Ons Now
Finally, decide what goes over and around the space before the footings cure, even if you build it later. A pergola, a deck with roof design, or a screened-in porch all add post loads the foundation has to carry. Pouring one or two extra frost-depth footings during the original build costs little; cutting into a finished patio to add them two years later costs a lot.
The same logic applies to utilities and heavy features. Run conduit under the patio base for future lighting. If a hot tub is on the wish list, tell your deck builder now so the framing and footings under that zone get sized for the load from day one. Multi-level deck layouts in particular benefit from this planning, since each level change is a chance to route wiring or add a built-in bench while the framing is open.
It pays off at resale too. According to the National Association of Realtors, 81 percent of homeowners say they enjoy their homes more after adding a deck, and deck and patio combos extend that use across more of the year by giving you a shaded upper level and an open lower one.
When to Bring In a Pro
You can handle the planning steps above yourself, and plenty of homeowners do. However, frost-depth footings, ledger attachment, and anything involving a roof or screened porch are where DIY risk gets expensive. Most Cincinnati-area jurisdictions require permits and inspections for attached decks, and an engineer may need to size footings for heavy loads. A local deck contractor who builds deck and patio combinations regularly will also know the Hamilton County permit path and the HOA setback questions that stall first-time builders, which is often worth the fee on its own.
If you need deck building and installation, Cincinnati Deck Pros can help.
Prefer to talk it through? Call (513) 613-3364 — a quick call is usually the fastest way to get a straight answer for your situation.