Can You Stain Pressure-Treated Wood? Timing and Best Practices for Ohio Decks
If you just rebuilt an old deck with fresh treated lumber, the next questions are usually the same two. Can you stain pressure-treated wood? When to stain treated lumber? The short answer to the first is yes, you can, but timing matters more than technique. New treated boards come out of the treatment process saturated with moisture, and stain applied too early sits on the surface instead of soaking in. In greater Cincinnati, where a deck faces humid summers and repeated freeze-thaw winters, staining at the right moment is the difference between a finish that lasts three years and one that peels by next June.
This guide walks through the process step by step, from the day your new deck goes in to the day you put the lid back on the stain can. It is written for homeowners who already replaced a failing deck, or are about to, and want the new one to hold up better than the last one did.
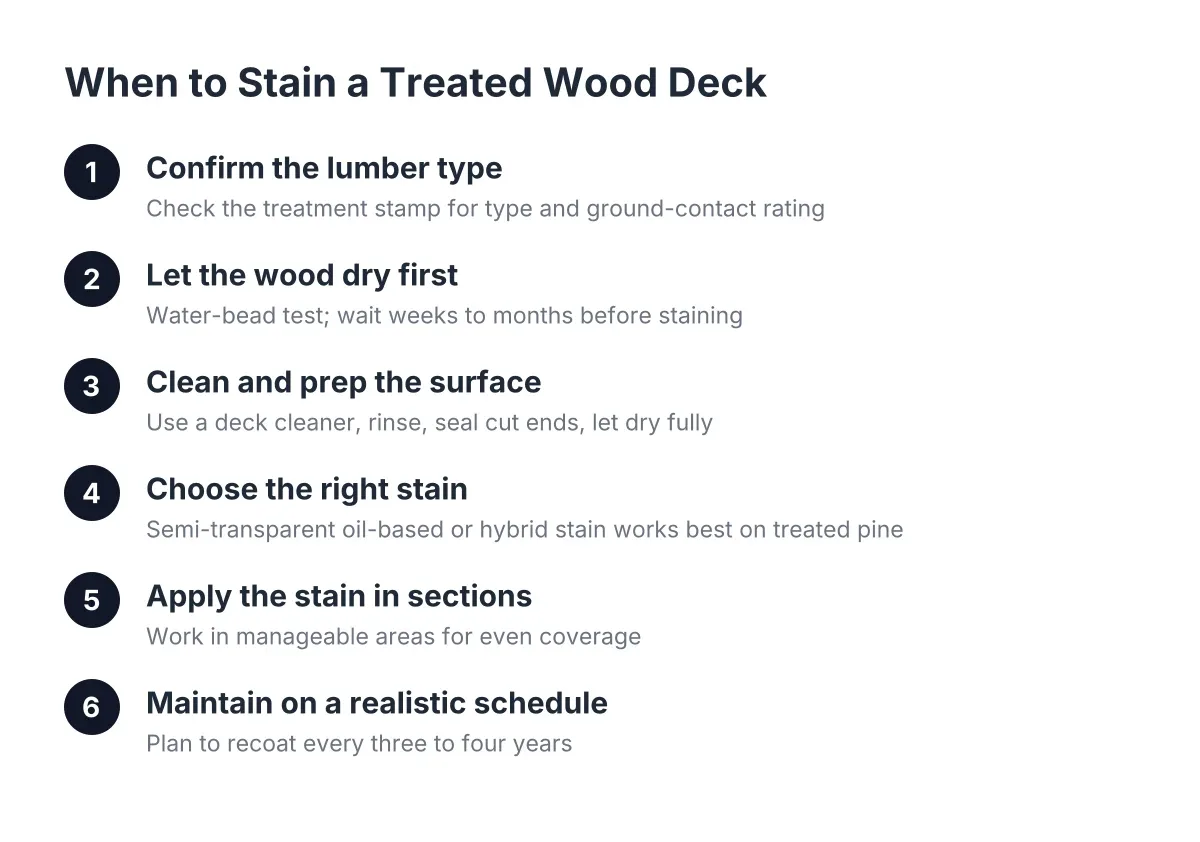
Step 1: Confirm What Kind of Treated Lumber You Have
Start by checking the treatment stamp on your boards. Most treated wood decking sold around Cincinnati is southern yellow pine, pressure-treated with a copper-based preservative. The stamp tells you the treatment type and whether the board is rated for ground contact or above-ground use.
Two things trip homeowners up here. First, some treated lumber at retail comes with a brown or cedar tone already on it. That color is an applied stain, not the treatment itself, so it tells you nothing about treatment quality. Second, treatment methods vary by region. West Coast lumber is often incised with small slits so the preservative penetrates harder species; Midwest southern yellow pine takes the treatment under pressure without incising, according to general industry practice. Around here, you will almost never see incised boards, so do not worry if yours look smooth.
If you find framing lumber with no treatment stamp at all, stop and investigate. Structural members like beams and posts need exterior-rated treatment. A rotted beam is a safety failure, not a cosmetic one, and if you rebuilt your deck because the old one went soft underfoot, you already know how that story ends.
Step 2: Let the Wood Dry Before You Stain
Should you stain pressure-treated wood right away? No. Fresh treated lumber is wet from the treatment process, and stain cannot penetrate wood that is still full of moisture. Most new treated decks in the Cincinnati area need several weeks to a few months of drying time before they will accept stain, depending on when the deck was built and how much sun it gets.
Here is the practical test, and it costs nothing. Sprinkle a few drops of water on a board in a spot that gets sun. If the water beads up, the wood is still too wet; wait and test again in a couple of weeks. If the water soaks in within a minute or so, the board is ready to take stain.
Timing by season matters in Ohio:
- A deck built in spring is often ready to stain by late summer or early fall of the same year.
- A deck built in fall may need to wait until the following late spring, since cold, damp winter months slow drying.
- Shaded decks and boards near the ground dry slower than sun-exposed boards, so test in more than one spot.
Do not wait too long, either. Treated wood left bare for two or three years starts to gray, check, and crack, and Cincinnati's freeze-thaw cycles push moisture into every unsealed crack. The sweet spot is staining as soon as the water test says the wood is ready.
Step 3: Clean and Prep the Surface
Even a new deck needs cleaning before stain. Dirt, mill glaze, and gray surface fibers block penetration. Use a deck cleaner or brightener made for treated lumber, scrub it in, and rinse thoroughly with a garden hose or a pressure washer on a low setting held at a consistent distance.
If you are restaining an older treated deck that has a failing finish, you will need a stain stripper first. One caution from the field: do not let stripper dry in the sun, because dried stripper can leave dark spots on the boards. Keep the surface misted until you rinse or pressure wash it off.
In addition, seal any fresh cuts. Any cut or drilled hole made in pressure-treated lumber exposes the untreated core and should be field-treated with an end-cut preservative sealer, according to the American Wood Protection Association. If your deck builder trimmed boards during installation, the cut ends at stair stringers and picture-frame borders are the spots to check.
Once the deck is clean, let it dry completely. Watch the forecast and pick a stretch with several sunny days in a row, since a deck you just soaked with a hose needs two or three dry days before it will take stain properly.
Step 4: Choose the Right Stain for Treated Pine
For treated southern yellow pine in the Cincinnati climate, an oil-based or hybrid semi-transparent penetrating stain is the workhorse choice. It soaks into the wood, sheds water, and wears by fading rather than peeling, which makes recoating easier in three or four years.
Your main options:
- Clear water repellent: protects against moisture but offers little UV protection, so the wood grays within a year or two.
- Semi-transparent stain: the most common choice; adds color, blocks UV, and lets the grain show. Yes, you can stain pressure-treated pine to look like cedar with a warm semi-transparent tone, which is a popular way to get the cedar look without cedar prices.
- Solid stain: covers grain like paint and hides older, weathered boards, but it can peel and is harder to maintain long term.
For a homeowner who just spent real money on a rebuild, semi-transparent is usually the right call. It shows off the new lumber and sets you up for straightforward maintenance instead of a stripping project down the road.
Step 5: Apply the Stain in Sections
Work board by board and section by section, especially in direct sun. Stain that dries in one area and gets overlapped later leaves visible lap marks that will not blend out. Start at the far corner and work toward your exit, doing the railings first so drips land on unstained decking.
A few rules that separate a clean job from a blotchy one:
- Apply a thin, even coat with a pad applicator, brush, or roller, then back-brush to work it into the grain.
- Never leave puddles. Pooled stain solidifies on the surface and never soaks in, and those shiny patches peel first.
- Follow the label on second coats. Many penetrating stains want one coat on new treated wood; a second coat on wood that cannot absorb it just creates a film.
- Stain in mild weather, roughly 50 to 85 degrees, and avoid days when rain is forecast within 24 to 48 hours.
Suppose a homeowner in Anderson Township rebuilds a 16-by-20 deck in April. In that scenario, a realistic plan is to run the water test in mid-August, clean the deck over a dry weekend in early September, and stain the following weekend while daytime temperatures are still comfortable. That timeline gets a sealed deck through its first Ohio winter instead of a bare one.
Step 6: Protect the Structure, Not Just the Surface
Stain protects deck boards, but the framing underneath decides how long the deck actually lasts. Fasteners driven into pressure-treated lumber should be hot-dip galvanized or stainless steel to resist corrosion from the copper-based treatment chemicals, according to the American Galvanizers Association. Joist hangers and connectors need a heavier zinc coating for the same reason, per Simpson Strong-Tie.
Some deck contractors also apply waterproofing tape over the tops of treated joists as an extra moisture barrier, a step TimberTech notes even though treated lumber already resists rot on its own. If your deck is being rebuilt rather than just refinished, these details are worth asking your deck builder about before the boards go down, because you cannot add them later. This applies to everything from the pressure treated wood 2×6 joists under the surface to the 2×4 blocking between them.
Step 7: Maintain on a Realistic Schedule
Plan on cleaning the deck each spring and restaining every two to four years, sooner on sun-baked south-facing decks and later on shaded ones. The water test works for maintenance too: when water stops beading on the surface, the finish is due.
One honest trade-off. If this maintenance rhythm sounds like more than you want to take on, that is the real argument for composite decking from brands like Trex or TimberTech, which trades a higher upfront cost for no staining at all. The 2025 Cost vs. Value Report from Remodeling Magazine and Zonda shows a wood deck recoups about 95% of its cost at resale nationally, versus about 89% for composite, so treated wood remains the stronger resale value if you keep up with the finish.
Common Questions About Staining Pressure-Treated Decks
Can you stain pressure-treated wood immediately after installation?
No, staining pressure-treated wood immediately after installation almost always fails, because the boards are still saturated from the treatment process. Stain applied to wet lumber sits on the surface, dries unevenly, and peels within a season. Wait until a few drops of water soak into the board instead of beading, then stain.
Can you stain pressure-treated deck boards that have already grayed?
Yes, you can stain pressure-treated deck boards after they have grayed, but they need prep first. Clean the boards with a deck cleaner and brightener to remove the gray, dead surface fibers, let the deck dry for several days, then apply a penetrating stain. A solid stain hides heavy weathering better than a semi-transparent one.
Can you stain over a deck that is already stained?
You can stain over an existing stain if the old finish is the same type and is still soaking in water rather than shedding it as a film. However, if the old stain is peeling or you are switching from solid to semi-transparent, strip it first. Recoating over a failing finish locks the failure in.
Does treated wood warp even after staining?
Stain slows moisture movement but does not stop warping in boards that were going to twist anyway. Board selection at the lumberyard matters more; posts and boards where the heart of the growth rings sits on the edge are more prone to twisting as they dry. A good deck contractor culls those boards before installation.
When to Bring in a Pro
Staining a healthy deck is a fair weekend project for most homeowners. Staining does not fix structural problems, though. If your boards feel soft or springy underfoot, the railing wobbles, or the framing shows rot at the posts or ledger, get a professional assessment before you spend money on finish. Stain over rot just hides the problem, and around Cincinnati, one more freeze-thaw winter can turn a soft spot into a failure.
Done at the right time, on dry wood, in thin coats, a stained treated deck gives you a durable, good-looking surface at a lower cost than composite. Get the timing right the first year, keep up the two-to-four-year rhythm after that, and this deck will outlast the one you just tore out.
If you need deck building and installation, Cincinnati Deck Pros can help.
Prefer to talk it through? Call (513) 613-3364 — a quick call is usually the fastest way to get a straight answer for your situation.